Black and White photos
Turning your colour photos into a black and white photos landscape is a great way to add impact, drama and emotion to your scenes. Landscape photographers have traditionally gravitated to mono using the traditional darkroom.
However, today it’s a lot less hassle and relatively easy to get great results quickly in the digital darkroom using photo editing software such as Adobe Photoshop CS and Elements.
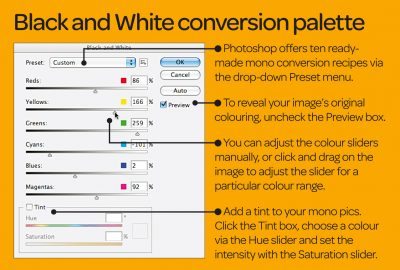
Our Photoshop tutorial below will show you how to use the numerous sliders within the Photoshop black and white conversion palette so you can learn how to fine tune your black and white landscape when photo editing.

The Black and White tool works by enabling you to vary the luminance levels of eight individual colour ranges independently. Here’s how…
Use the sliders
Drag a colour slider to make the grey tones of that colour range darker or brighter. The strip above shows how light the tone will be.

Be more precise
Click within your image and drag to the right or left to lighten or darken those tones. Click Preset Options to save your greyscale mix.
Black and White Photo Editing Tip!
Be cautious when making mono conversions as radical shifts can quickly lead to serious quality issues, such as halos, blocking, noise and banding.
For this reason it’s crucial to keep an eye on your image at 100% magnification when you make changes.
Check out this conversion table.

You know this is very easy to do. If you love BW photography you can try this with many of your images.
Here is for Photoshop Elements.

Here are tips for landscape photography.
Shoot during the golden hour
Great landscape photography is as much about planning, preparation and patience as it is about focal lengths, f-stops and filters. A few minutes spent checking the weather forecast, scouting the location and waiting for the right light can make an enormous difference to the final image.
Of course, your wait for the ‘right’ light will be a lot shorter if you head out at the right time of day. Shoot too close to noon in the summer and you’ll be rewarded with short, dense, black shadows and harsh highlights from the overhead sun, so that even a hilly landscape will look flat and uninteresting.
However, if you shoot in the hour after sunrise or before sunset the sun is much lower in the sky, and the longer, softer shadows reveal the undulations in the vista before you. The light also has a warmer colour, making the whole scene look so much more inviting than a midday landscape.
The key to shooting in what’s often referred to as ‘the golden hour’ is to arrive well in advance so that the camera is set up on the tripod, the image is composed, and the filters are in place long before the perfect light appears.
In the morning this means getting up before dawn, which in the summer feels like the middle of the night! It’s worth it though, because pockets of early morning mist and a light sprinkling of dew can give landscapes a magical, untouched appearance that will give your ?images the edge.
If you really can’t bear to get up before dawn, the best alternative is to shoot at dusk. Obviously there won’t be any dew to twinkle in the low sunlight, but any flowers that close overnight will be fully open, and it’s easier to see the image you’re composing while you wait for the perfect light to arrive.
For Inspiration google Ansel Adams: http://www.anseladams.com/
or check out this link. http://photography.nationalgeographic.com/photography/photo-of-the-day/black-white/