How to focus your iphone photos
Have you wondered how to focus your iphone photos?
Setting focus accurately is key to getting sharp iPhone photos, but there are times when it’s hard to get focus exactly right… Especially when you’re shooting small subjects! And that’s why I want to share with you an advanced trick that will help you set focus in your iPhone photos exactly where you want it!
Lack of correct focus in an image is probably the number one reason why a potentially good iPhone photo can fail. Other problems such as exposure and color can often be fixed in post-processing, but when something is too out of focus there’s nothing you can do – you can’t make a blurry photo sharp. There are several reasons why a photo may have focus problems, and in this tutorial you’ll discover how to deal with each of these situations to ensure that you always get your iPhone photos in sharp focus.
Why Is Focus So Important?
A photo that is completely out of focus, where all parts of the image are blurred, obviously won’t look good (unless done deliberately for creative effect). If the entire image is blurred you won’t be able to make out any detail in the scene. Making sure that at least part of your photo is in sharp focus is very important.
Focus helps to draw attention to the most important part of the scene, which is normally the main subject. If your main subject is out of focus, attention will be diverted to the other parts of the scene that are in focus, which isn’t usually what you want.
Sharp focus provides fine detail in the subject which might help to convey the message or story your photo is trying to get across to the viewer. This might be the water droplets on a flower, catch-lights in an eye, the detail of wood grain or the veins in a leaf.
Getting focus correct should be one of your top priorities when taking photos with your iPhone. Before long it’ll become second nature and you’ll be able to concentrate on other aspects of your photography.
Understanding Depth Of Field
Depending on various factors such as the proximity of the subject to the camera, and the distance between the subject and the background, you may either get all of your scene in focus, or just a small portion of it in focus while the rest of the image is blurred, or somewhere in between.
This amount of focus from front to back of the scene is called depth of field. When a large amount of the image is in focus, from foreground to background, we refer to this as a large depth of field.
When only a small portion of your scene is focus, with anything closer or further away out of focus, we refer to this as a shallow depth of field.
Don’t assume that out of focus areas in your scene aren’t important. They actually help reinforce the subject that is in focus. But you must always make sure that the right part of the scene is in focus.
So, let’s take a look at ten tips to help ensure you always get your iPhone photos perfectly focused.
1. Always Tap To Focus
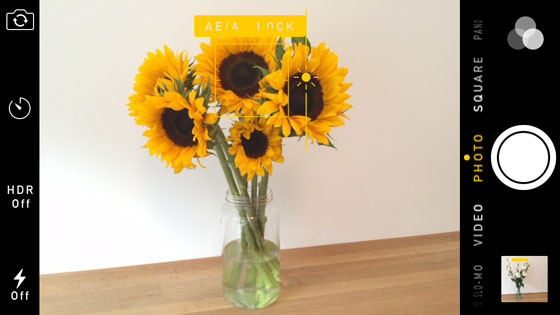
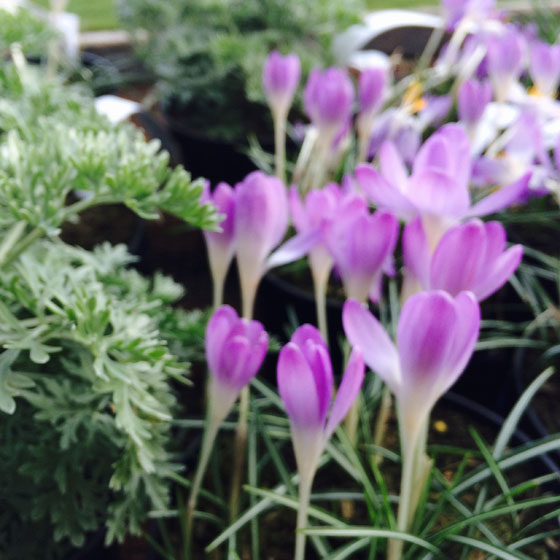
As clever as the iPhone camera is, it can’t always recognize the most important part of the scene. The camera’s autofocus is pretty good at picking out faces, but without a face to focus on it will always focus on the centre of the scene.
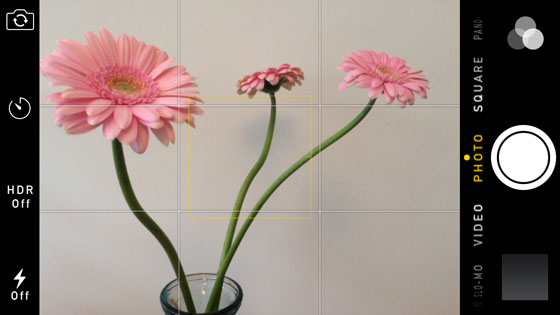
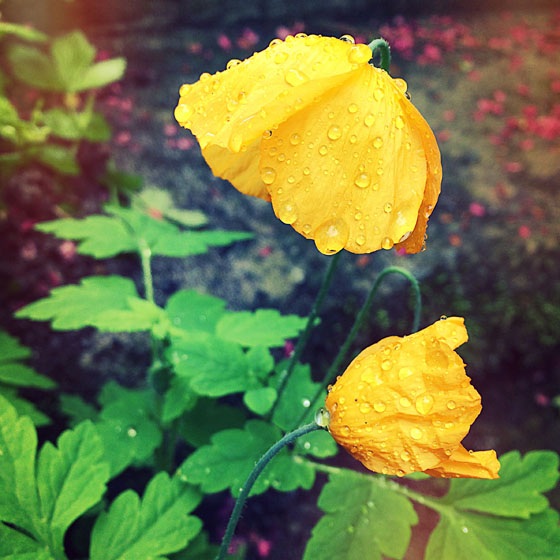
The yellow box in the screenshot above tells you which area of the scene the camera is focusing on. The autofocus has set focus in the middle of the frame which means that the stalks of the two flowers at the back will be nicely in focus.
But in this case, it’s unlikely that you’d want to focus on that part of the scene. You’re more likely to want the large flower on the left to be in sharp focus.
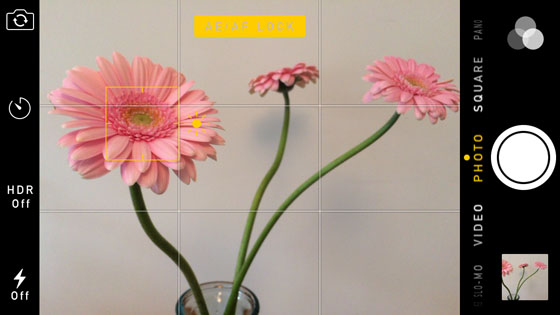
If you’re serious about your iPhone photography you’ll want to take control of what the iPhone focuses on. Luckily this is very easy to do.
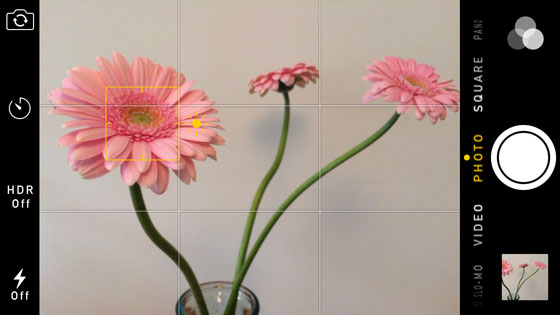
In your camera app, simply tap on the screen where you want the focus to be and the iPhone will do the rest. In the screenshot above, you can see that I tapped on the large flower on the left hand side. Remember, the yellow box shows you where the camera is focusing.
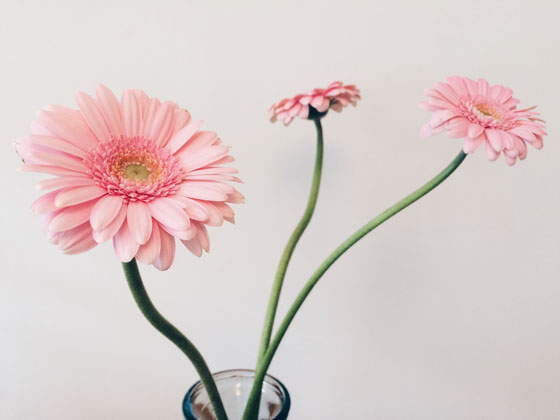
Here’s the resulting photo. Can you see how the large flower on the left is in sharp focus, while the other two flowers that are further back appear slightly out of focus? That’s because I forced the camera to focus on the large flower by tapping on that part of the screen.
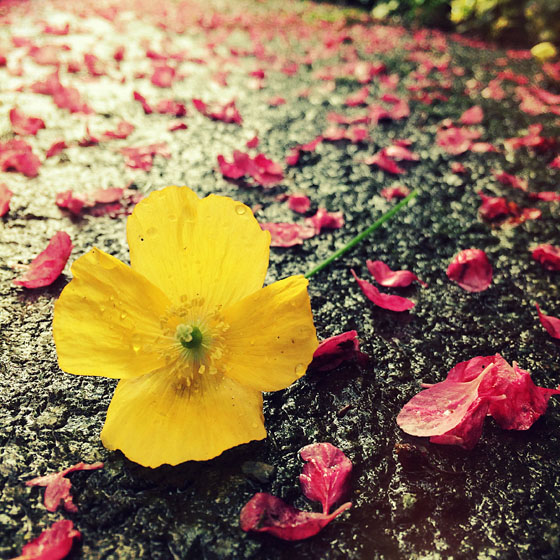
Below are two more examples showing you how important it is to tap on the correct part of the scene when setting focus.
In the photo above, you can see the results of tapping on the flower in the foreground to keep it in focus. The depth of field is quite shallow in this image and the background has gone nicely out of focus.
This example shows what happens when I tapped to focus on the background of the scene. The flower in the foreground is now out of focus.
Remember, whenever you take a photo with your iPhone, think about which part of the scene you want in sharp focus. Then tap on that area of the screen to set focus on that part of the image. Anything closer or further away from that object may appear out of focus.
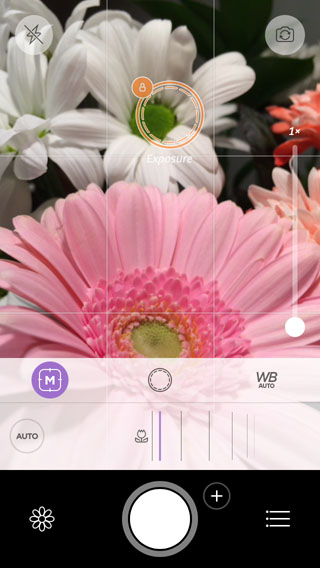
2. Adjust Exposure After Focusing
Apart from focus, getting the photo correctly exposed is extremely important. Exposure refers to how bright or dark the photo is. Although this article isn’t about exposure, on the iPhone the exposure of your photo is linked to the focus point, which is why we’re going to cover this here.
Your iPhone will automatically set the exposure based on where you tap to focus. If you tap to focus on a bright area of the scene, the camera will ensure that area of the scene is correctly exposed. Likewise, if you tap to focus on a dark area of the scene, exposure will be set for that part of the image.
Sometimes this works fine, but other times you might want to focus on one part of the scene, but expose for another. With iOS 8, Apple have made it easy to adjust the exposure after setting focus.
After tapping on the screen to set your focus point, simply slide your finger up or down the screen to adjust the exposure to suit. As you slide your finger, you’ll see the yellow sun icon moving up or down the exposure slider next to the focus box.
As you adjust the exposure try to ensure that no part of the scene goes completely white or completely black, otherwise the camera might not capture any detail at all in these regions.
3. Tap & Hold To Lock Focus
Even when you tap to set focus, if anything changes in the scene the camera may automatically adjust focus and exposure. For example, if you’ve set focus on your subject, then someone walks through your scene, the camera might re-adjust the focus and exposure onto that person.
To ensure this doesn’t happen, you can lock the focus on your subject, effectively disabling the autofocus feature. So even if the rest of the scene changes, your subject will still be in focus.
To ensure focus remains locked, tap and hold for a couple of seconds on the subject you want in focus. When focus is locked you’ll see AE/AF LOCK in a yellow box at the top of the screen. AE means Auto Exposure and AF is Auto Focus.
Even though exposure is locked when you tap and hold, you can still swipe up or down on the screen to adjust the exposure without changing the focus point. Once you’ve locked focus, it will remain on that area of the scene no matter what happens.
For example, in the flower scene above, you could rearrange the two flowers in the background without losing focus on the main flower on the left, as long as you don’t change the position of this main subject.
In street photography you can position yourself in a good spot where you know people will walk into the frame, then lock focus and exposure in advance so that you’re ready to shoot as soon as someone walks into the scene.
7 Hidden iPhone Camera Features
As it turns out, the most important iPhone camera features are completely hidden from regular iPhone users. That’s why we created this free video revealing 7 hidden iPhone camera features that every photographer should use. Click here to watch this video.
4. Don’t Change Distance After Focusing
After setting your focus on a particular part of the scene, make sure you don’t change the distance between the iPhone and the subject. This is very important as focusing works by setting the focus point at a particular distance from the camera.
When you tap to set focus you’re telling the camera to focus on any objects at or near that particular distance from the camera’s lens. We call this the focal plane. Any objects that are in front of or behind this focal plane may appear out of focus.
Therefore, if you tap to set focus and then you change the distance between your camera and the subject, that subject might no longer be sharply focused because it’s not situated at the focal point that you set.
In the example above, you can see that the flowers in the foreground are in sharp focus because that’s the area I tapped on my camera screen. But what happens if I set focus and then take a step back?
Here’s what happens – the whole image is now out of focus. I told my iPhone to focus at a certain distance from the camera, and now I’ve changed that distance. But the camera is still trying to focus at the distance I initially set.
From this example you can see how important it is to ensure that you don’t change the distance between your camera and your subject once you’ve tapped to set focus. If you need to move closer or further away from your subject, ensure you tap again to set focus before you press the shutter button.
Don’t forget that even if you stay still your subject may be moving (a lively child or pet!) and your locked focal distance may not apply if they move closer or further away from the camera. If this happens, simply tap on the screen again to reset the focus.
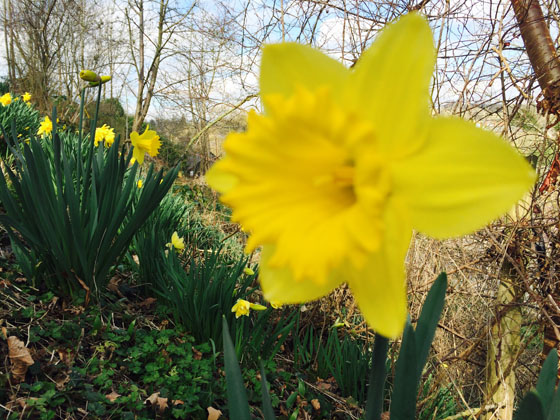
5. Avoid Very Close Subjects
The design of the iPhone camera means that it can’t focus on very close subjects. On the iPhone 5s, 6 and 6 Plus, the camera can’t focus closer than about three inches. With this in mind you need to be careful not to get too close to your subject, otherwise you’ll only be able to get blurry shots!
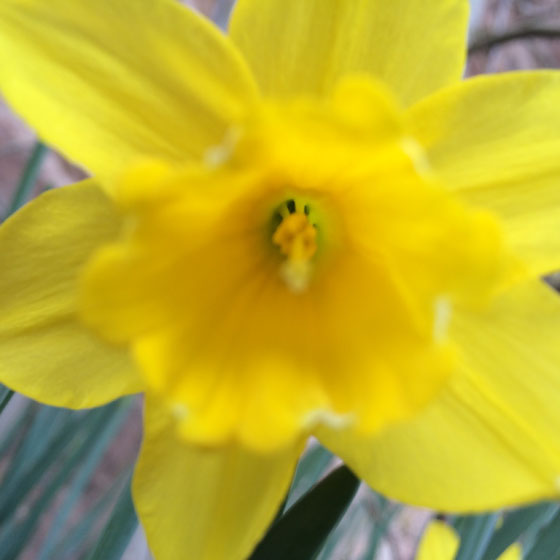
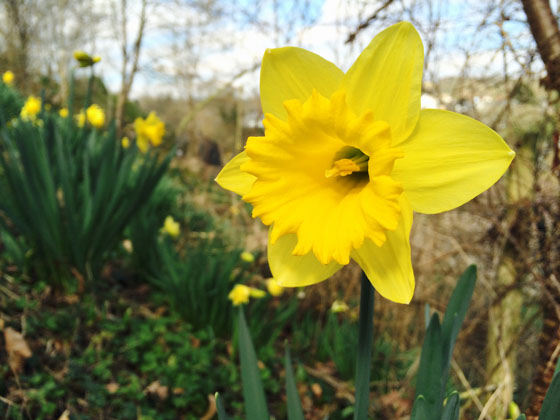
Here, the lens of my iPhone was too close to this daffodil flower. No matter how many times I tapped to try and set focus, I was never going to get the flower in focus because the camera isn’t capable of focusing at this close distance.
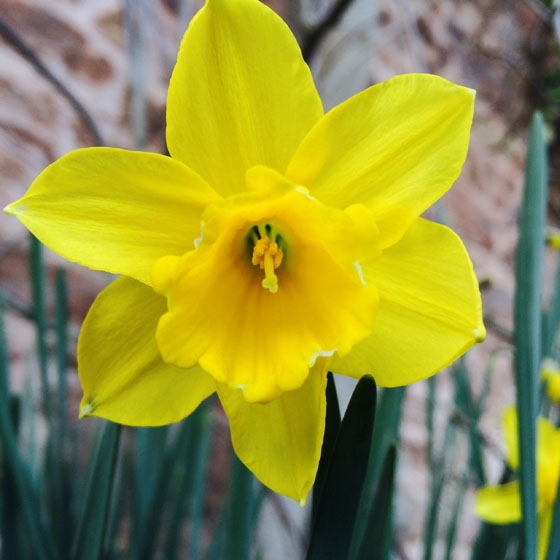
By pulling the phone back a couple of inches, I was able to get the flower in focus. Remember, whenever you change the distance between your phone and the subject, always tap again to set the focus point.
Sometimes it might be frustrating when photographing close up shots like flowers because you can’t get close enough to avoid getting some of the distracting background in the shot.

However, bear in mind that you can always crop away the edges of the photo if necessary. Yes, you’ll lose some pixels from your photo during the crop, but if you’re not planning on printing the photo at a large size, then it should be fine as long as you don’t crop too much away.
It’s better to get the subject in focus and then crop away the edges of the photo, than to get too close and end up with the whole image blurred.
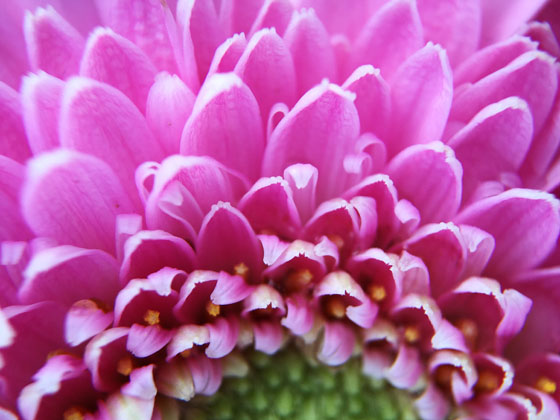
6. Use A Macro Lens For Extreme Close Ups
Sometimes, especially in close up macro photography, you just need your subject closer than the iPhone will allow. If you want to focus on anything closer than about three inches you’ll need to attach a third-party macro lens to your iPhone.
Macro lenses, such as the Olloclip, allow you to get the lens extremely close to your subject, capturing detail that is often invisible to the naked eye.
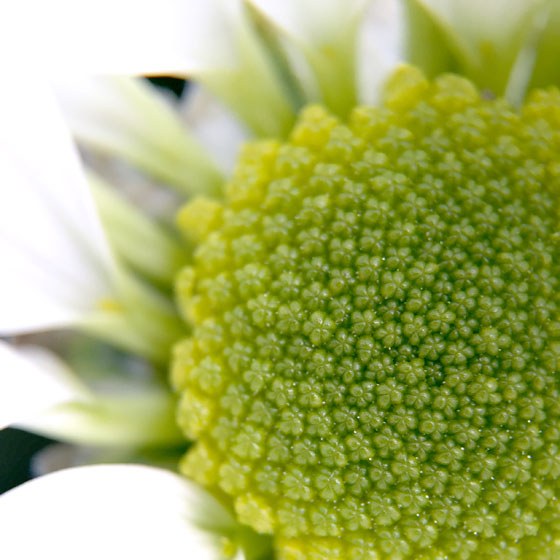
One side effect of using a dedicated macro lens is that you get a very very shallow depth of field, where only a small portion of the image will be in focus. Therefore, accurate focusing is critical.
You may have to take a few shots, tapping on different areas of the screen, before you get the focus on the part of the subject that you want. It’s vital that you don’t change the distance between the lens and the subject as the tiniest change will mean you don’t get what you want in focus.
There are quite a few lens manufacturers who make macro lenses for the iPhone, but they do vary in quality so shop around, read reviews and see if you can try a friend’s lens before you make a purchase.
7. Achieve A Shallow Depth Of Field
Depth of field refers to how much of the scene is in focus, from front to back. A photo with a large depth of field will have all or most of the scene in focus, from near to distant objects.
Shallow depth of field is when only a small portion of the image is in focus, and anything behind or in front of that part of the image appears blurred.

A shallow depth of field is a great way of blurring out the unimportant parts of the scene, such as distracting backgrounds, while keeping the main subject sharply focussed. This puts the emphasis on the main subject, making it more important in your composition.
With DSLR cameras we can adjust depth of field by controlling the size of the camera’s aperture (the hole in the lens through which light travels). But the iPhone has a fixed aperture which limits our options for controlling depth of field.
However, this doesn’t mean that you can’t get a shallow depth of field with the iPhone. You can influence the depth of field to a certain degree with a trick that works with all cameras.
As a rule of thumb, the further away your subject is from the camera’s lens, the greater the depth of field will be and more of the scene will be in focus. The closer your subject is to the iPhone, the shallower the depth of field will be.
So to get a shallow depth of field in your iPhone photos, have your subject as close as you can to your iPhone so that it fills as much of the frame as you require. Remember not to get too close or it might not be able to focus.
Make sure you tap to set focus on the main subject. If you let the camera’s autofocus decide, you might end up with the background in focus while your subject appears blurred.
Another thing to remember here is that the distance between the subject and the background also affects depth of field. The further away the background is from your subject, the more out of focus the background will appear.

In this photo, the camera was fairly close to the subject and focus was set on the cat’s face. However, because the background isn’t far away from the cat it doesn’t appear that blurred.
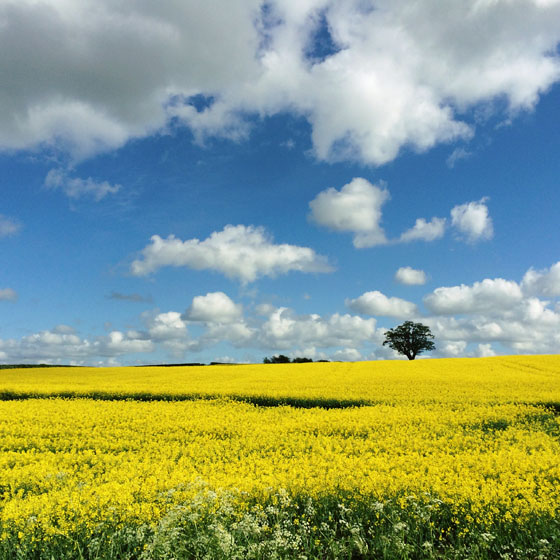
By contrast, the background in the photo below is much more blurred. In this shot, the camera was held close to the window and focus was set on the water droplets.
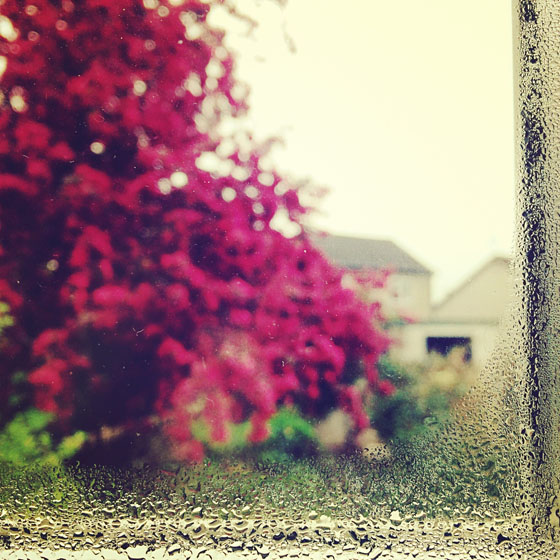
Because the tree in the background is quite a distance from the window, the background appears very blurred. If the tree was much closer to the window, it wouldn’t be so blurred.
So to recap, the closer the camera is to the subject, and the further away the background is from the subject, the shallower the depth of field will be.
8. Achieve A Large Depth Of Field
There’s a lot of science to depth of field, but in practice, the further away your subject is from the camera, the greater your depth of field will be and more of the scene will be in focus.
While shallow depth of field often looks great because of the blurry backgrounds, this isn’t always what you want. In many cases, particularly with landscape photography, you’ll want as much of the scene as possible in sharp focus.
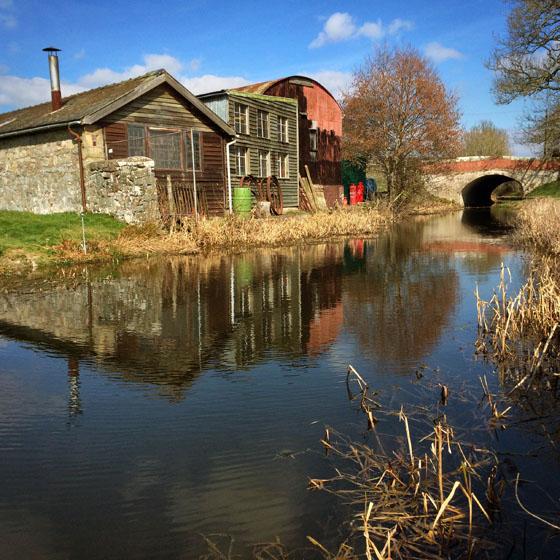
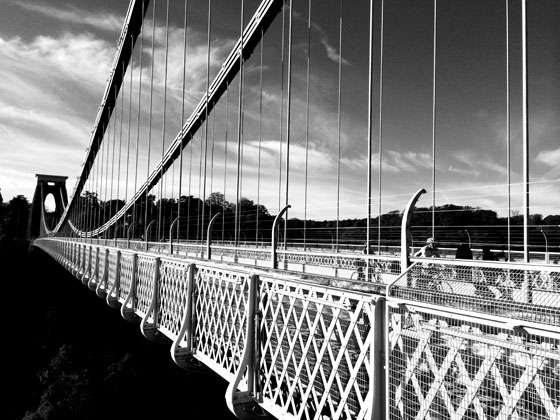
In this photo I wanted everything to be in focus, from the reeds in the water at the bottom of the frame through to the buildings and the bridge in the distance. By making sure that I didn’t have anything too close to my camera, I easily achieved a large depth of field.
While the focus point in photos with a large depth of field isn’t as critical as shallow depth of field images, you should still tap to focus on the most important part of the scene. It might be barely noticeable, but some parts of the image are likely to be slightly more in focus than others in this kind of photo.

In the photo above, I tapped to focus on the woman as she is the main subject in the photo. If the sand in the foreground and the rocks in the far distance are slightly out of focus, this won’t affect the impact of the image.
But if the woman was slightly out of focus, it would just look like a bad photo that wasn’t focused properly. So always tap to focus, even when you’re taking photos with a large depth of field.
9. Avoid Camera Shake
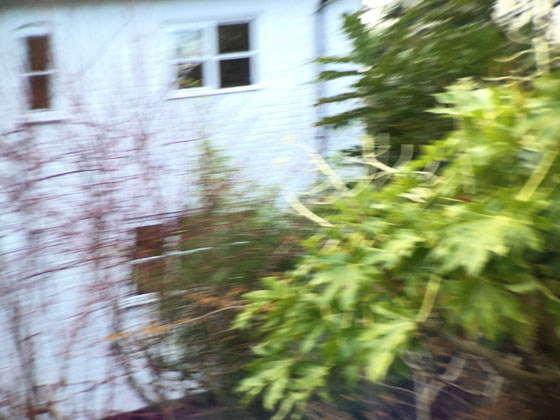
In low light your iPhone has to use a slower shutter speed in order to capture enough light to create your photo. Unfortunately this gives you more time to introduce “camera shake” which will most likely result in a completely blurred image like the one shown below.
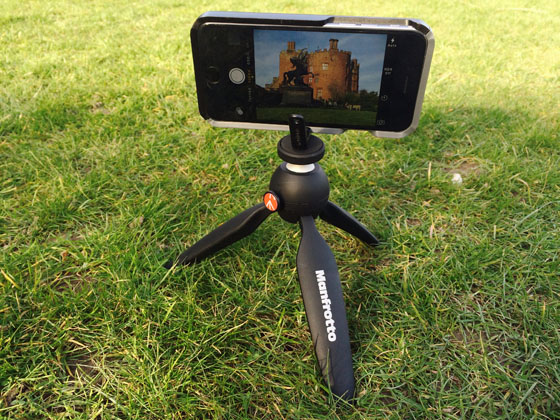
To reduce the chances of this happening you should try and keep the camera as still as possible. The ultimate solution is to use a tripod to keep your camera perfectly steady while shooting.
The next best option is to hold the iPhone against something solid, such as a wall, a lamppost, a door frame, a tree trunk, a table top, a car roof, a fence or even the floor. Make use of whatever is available to keep your iPhone steady.
If you really have nothing to support your phone then try slowing your breathing to avoid your body moving so much when you press the shutter. Find a body position that enables you to hold the iPhone more steady. Try kneeling on the ground or holding the iPhone closer to your body rather than with arms outstretched.
Lastly, if you have the ability to introduce more light, artificial or otherwise, then this will enable the iPhone to use a faster shutter speed which will reduce the chances of blur in your image.

Using a small LED lamp allowed me to illuminate my subject in this low light portrait photo, ensuring that I could get a sharp shot even while hand holding my iPhone.
10. Use Manual Focus
Sometimes, no matter how hard you try, you might not be able to get the camera to focus on the exact spot you want. The Camera+ app is one of a handful of quality iPhone apps which gives you full manual control of your iPhone, including manual focus.
By default, Camera+ uses autofocus. But you can override this by tapping on the screen, then tapping the square focus icon in the pale grey bar at the bottom left of the screen.
Slide your finger left or right across the horizontal focal distance slider above the shutter button. The square focus icon will turn into a purple M (M for Manual Focus). Slide your finger left to focus further away (a landscape icon is displayed at the limit of the slider) or right to focus close up (a flower icon is displayed).
As you use this slider, keep an eye on what the screen is showing you. When you think the correct part of the scene is in focus, simply press the shutter button to take the photo. To switch back to autofocus, tap the Auto button to the left of the focus slider.
…