child photography

Tips for taking great portraits

Tips for taking great portraits

Here are some tips for taking great portraits;

Do you struggle to take professional looking portrait photos? In this tutorial you’ll discover highly effective techniques that will take your portrait photography to the next level. You’ll learn how to set up the scene for maximum impact as well as the best camera settings to use. By the end of this article you’ll be able to shoot stunning portrait photos with your DSLR or mirrorless camera.

  1. BackgroundIn portrait photography the background is just as important as the subject. A busy or distracting background will take attention away from the person in your photo.Usually for portrait photography you’ll want a neutral, uncluttered background that won’t distract the viewer from your portrait subject. Another technique is to include an object in the background to provide added interest or context. For example, an artist in front of her easel, a fisherman in front of a boat or a musician in front of her guitar. However, you don’t have to choose a completely plain background. For instance, an interesting wall or fence could provide a wonderful pop of color or texture.

  2. Prepare your subject.Even the best, most expensive camera equipment will produce poor results if your subject isn’t ready, comfortable, relaxed and feeling their best.Being photographed is quite an unnatural and therefore stressful experience for the subject, so your job as a photographer is to make the experience simple, fun and stress-free.

    Break the ice by making small talk. Even if you know the person well they may still be feeling apprehensive.

    Explain the kind of shot you want – or ask them what kind of shot they’d like. Be open to suggestions from your subject.

    For child photography get down to their level and talk to them gently. Tell them you’re going to have great fun. And encourage them to play and forget about the camera.

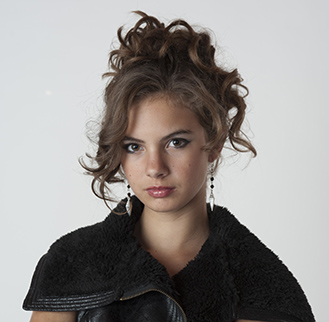
    If possible ask your subject to wear neutral colors – preferably dark colors – because this helps your subject’s face stand out better.

    Check your subject over for anything that might be distracting such as fluff on clothes, uneven buttons and zips, collars, lapels, clothes riding up, shirt half tucked in, etc

  3.  Pose your subject.
    Now that your subject is ready, comfortable and relaxed you need to keep them that way throughout the shoot. Work quickly but confidently and calmly, giving them clear instructions as you shoot.It’s unlikely they’ll know how to pose for you so you’ll need to give them constant guidance.Don’t overwhelm them with complicated requests. Just get them to make small, simple adjustments, for example, “Raise your chin a little,” “Straighten your back,” or “Now look at me.”

    Let’s explore some different posing techniques that you could try. Have your subject sit down. This keeps them still and they’ll feel more relaxed and comfortable.

    Have the subject lean slightly towards the camera for a more engaging pose (or shoot slightly from above to get the same effect).Have their body and shoulders turned slightly away from the camera for a natural feel. Or, for a more confrontational image, have their shoulders square-on to the camera as shown below.Introducing props is a great way to add something special to the shoot. These could include hats, party glasses, balloons, a pen, a flower or a musical instrument.

  1. Lighting.
    Generally speaking, natural daylight is the most attractive light source for portrait photography – especially if you don’t have dedicated studio lighting.A slightly overcast day provides a lovely soft light that will be flattering on your subject. Direct sunlight isn’t usually desirable because it creates strong, hard shadows on the subject’s face. In such conditions it’s best to find some light shade to position your subject.Alternatively, embrace the opportunity and shoot (carefully) into the sun, with your subject’s back to the sun. This is called backlighting and can result in a golden glow around your subject.

    Keep in mind that shooting into the sun does require you to provide some “fill” light to illuminate the shadows on your subject’s face.

    Fill light can be reflected sunlight, bounced back onto the subject’s face using a reflector or even a simple sheet of white card. Alternatively you could use your camera’s inbuilt flash or an external flash as demonstrated above.

    You can use natural daylight indoors too. For best results put your subject near a window, and have your subject facing slightly towards the light.

  2. Blur the background.
    A sure-fire way to raise your portrait photography game is to shoot with a shallow depth of field. This allows you to have your subject in sharp focus while the background appears blurred or out of focus, helping your portrait subject stand out.You can control the depth of field on your camera by adjusting the lens aperture. The aperture is the opening inside your lens which allows the light to travel through from the front of the lens to the camera’s sensor. Your lens will have a minimum and maximum aperture range.Aperture is measured in f/stops. The bigger the lens aperture, the smaller the f/number will be. The larger the aperture (the smaller the f/number) the more blurred your background will be.

    Follow these tips and you’ll soon be creating beautiful professional-looking portrait photos with your DSLR or mirrorless camera.

charlottebell

EDUCATION 2010 Student Tony Corbell. 2011 PPA Photography School, Dallas TX 2010 Student Kirk Tuck, Austin, TX 2000- Marketing consultant for The Rug Hook Project of MX 2004- Organizer of Travis Heights Art Show 2004 Student Dan Burkholder, Platinum printing and digital photography 2004 Student Tom Knapp, printmaking 2004 Student of Lander Rodriguiz, photoshop 2003 Author of “Tears from the Crown of Thorns” 2003 Student of Jo Brenzo Master photographer 2002 Student of Jill Skupin Bromoil photography 2002 Student of Ray Carafano Holga Camera photography 2001 Student of Lisa Mackie, NY, NY Printmaking 2001 Student of Jim Johnston San Miguel de Allende, Mexico Printmaking 1998 Instituto Allende, San Miguel de Allende Photography 1997 Instituto Allende, SMA Photography 1995&96 Elizabeth Ney Sculpture School Sculpture 1996 Boulder Sculpture Academy Sculpture 1995 Daugherty Art Center Photography 1994 Instituto Allende. San Miguel de Allende Photography 1969 University of Minnesota BS Psychology, minor Art

Share
Published by
charlottebell

Recent Posts

photo tips galore

photo tips galore This site will give you photo tips galore. Please check it out. …

4 weeks ago

Shutter speed

Shutter speed This blog is to acquaint you shutter speed  so you have more control…

4 weeks ago

Using the “rule of thirds”

Using the "rule of thirds" It is so simple once you know this technique. Using…

4 months ago

ISO made simple

ISO made simple Many people want to take photos in low light conditions. That is…

4 months ago

Making childrens photography wonderful

Making childrens photography wonderful Making childrens photography wonderful is a easy when you know how.…

6 months ago

Exposure compensation

Exposure compensation Exposure compensation is relatively easy to use in most cameras and helps getting…

7 months ago