More Weird tricks that really work for photography
Here are More Weird tricks that really work for photography. I love this stuff. Try them out.
Camera strap GND filter
This is my all-time favorite landscape photography tip because I use it all the time and most people have never heard it before. When shooting landscapes, the sky is often much brighter than the rest of the landscape so you need something to darken down just that top part of the photo. A graduated neutral density filter does exactly that. A GND filter is a piece of glass that is darkened at the top and which gradually tapers off to clear. The photographer simply holds this filter in front of the lens to cover the sky and it darkens the sky without affecting the landscape underneath.
Call me forgetful, but I often forget to bring my GND filter with me when I’m shooting landscapes, and it can ruin the shoot if I can’t darken down the sky to balance the exposure. One trick I’ve learned is that you can simply use anything dark (a black piece of paper, a camera strap, etc) to hold in front of the lens for part of the exposure and the same thing is accomplished.
Insulation reflector board
I debated whether or not this counts as a “camera trick” or if it’s really just a super-awesome reflector that costs basically nothing. Call it what you will, but it works so well that I have to share this tip.
Circular reflectors are excellent for improving the lighting in your outdoor portraits. By holding them to reflect the sun’s light, you can fill in shadows and put beautiful highlights on the face of the person you’re shooting. However, most circular reflectors only work for a head-and-shoulders shot and only for one person. You can purchase a large full-body reflector, but they usually cost around $70.
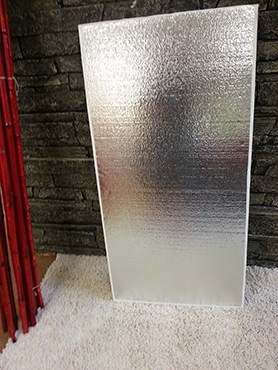
THE BACK SIDE IS WHITE.
One trick I learned from a photographer who shoots celebrities is to simply purchase insulation board for $5 and then cover the back and edges with white duct tape. You’ll find insulation board with reflective silver backing at any home improvement store. It comes in several sizes. I chose one that is 4 feet (1.2 meters) in height.
This simple solution gives you a very large reflector that is lightweight, and you can use one side to reflect silver and the other side to reflect white. Awesome!
Oh, and I also use this as a way to put a little wind in the hair of my models when I’m shooting someone with long hair. Just have an assistant fan up and down with the reflector board and it gives just the right amount of wind to give the hair some bounce without blowing the models away.
Reflector as studio backdrop
Sometimes when I’m shooting outdoor portraits, I see a pose or an expression for the model that makes me wish we were in the studio so I could photograph them on a white background. Sometimes a white background is the best way to focus all attention in the photo on the model, and it gives the photo a bright and clean look. When I’m in this situation, I often grab a simple $25 reflector and use it as a studio backdrop on the spot!
The trick for making this technique work is to use positive exposure compensation. The camera will try and dim down the white background to a dull gray because it thinks the white is overexposed. About 1 stop of exposure compensation will make the reflector background look bright white.
Delete tourists from travel photos
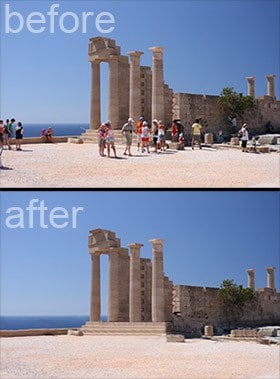
THIS LITTLE TECHNIQUE MAKES IT EASY TO GET RID OF THE TOURISTS IN YOUR TRAVEL SHOTS! (PHOTO FROM STOCK)
This is an awesome trick for travel photographers. Sometimes you’re at an amazing location, but there are people in the way of your shot. If you want to take a picture of a landmark and people are in your shot, you will likely spend the rest of your adult life cloning people out of the shot unless you try this technique.
Step 1: Set your camera on a tripod.
Step 2: Take a picture about every 10 seconds until you have about 15 shots, depending on how fast people are walking around.
Step 3: Open all the images in Photoshop by going to File > Scripts > Statistics. Choose “median” and select the files you took.
Step 4: Bam! Photoshop finds what is different in the photos and simply removes it! Since the people moved around, it fills the area where someone was standing with part of another photo where no one was there.
Remove the lens for macro
This is the coolest camera trick I’ve seen in a long time. If you take off your lens and hold it in front of the camera, you get a macro lens! I was really skeptical about this, but I just tried it and it worked like a charm.
There are four things you need to know about using this trick: (1) Your camera won’t take a picture with the lens off unless you’re in manual mode. (2) The best focal length seems to be around 50mm, so either a 50mm prime or an 18-55mm kit lens would be perfect! (3) Obviously, you lose autofocus since your lens isn’t attached to the camera. Focus is achieved by simply moving closer to or further away from the subject, and (4) The camera can’t open up the aperture, so you’ll do it with your hand. On the back of the lens (the side you mount on the camera), move the little plastic slider piece that controls the aperture. If you look in the lens while doing it, you’ll see the hole open up.
If you want to take this a step further, you can buy a reverse lens mount for $5 or $10 which should sharpen up the images quite a bit since it will hold the lens more solidly. Also, be sure to use a tripod when doing this or any other macro photography. With such fine detail, even a tiny movement can destroy the sharpness.
Day to night in a flash
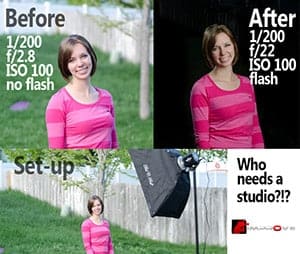
TURN YOUR FLASH TO FULL POWER
Sometimes you’re out shooting portraits on a bright sunny day and the light just looks too… natural. I often find this is the case when shooting a wedding or engagement when I’m shooting at a park or other outdoor location and I get bored with the same lighting in every shot.
One trick that I really enjoy is to turn up the power on my flash to the max. This will, obviously, make the subject extremely bright. If you change your camera settings to expose for the subject, it will make the background look extremely dark because the flash didn’t hit it.
Try making your own More Weird tricks that really work for photography.