Advanced camera controls for Iphone 7
Check out the Advanced camera controls for Iphone 7 in this blog. You will be amazed at the options you have right there in your phone!!
Do you enjoy the creative photography options you get with your DSLR, but find that you often miss out on great shots because you don’t have your camera with you? What if we told you that you could achieve the same level of camera control that your DSLR provides, but with nothing more than your iPhone? In this tutorial you’ll discover just how easy it is to use the advanced iPhone camera controls so that you can start taking incredible photos with the camera that’s always with you.
1. Focus
No matter what type of camera you’re using, getting your subject in sharp focus is essential for high quality photos with superb detail. And the iPhone makes it incredibly quick and easy to get the perfect focus every time.
Sometimes you might want to lock the focus point, especially if there’s movement in the scene. For example, if someone walks through the background of your scene, the camera’s autofocus might readajust the focus onto that person.Or with any scene, if you moved the position of one the background images, the camera might readjust focus onto that image
To prevent the camera from adjusting focus and exposure, you need to lock focus on your subject, effectively disabling the autofocus feature.
To lock focus, just tap and hold for a couple of seconds on the main subject until you see AE/AF LOCK in a yellow box at the top of the screen. To unlock the focus point, tap anywhere on the screen.
In certain shooting situations, the tap-to-focus method might not give you enough control over your point of focus.
In such cases you can use a third-party camera app that has a manual focus feature. Camera+ is a popular camera and editing app that takes full advantage of the manual focus abilities of the iPhone. Ensure you’re in the camera section of the Camera+ app (rather than the editing section), then tap on the little box that has the word “Auto” inside it. This will open up the manual focus control slider with a purple bar.
Ensure you’re in the camera section of the Camera+ app (rather than the editing section), then tap on the little box that has the word “Auto” inside it. This will open up the manual focus control slider with a purple bar.
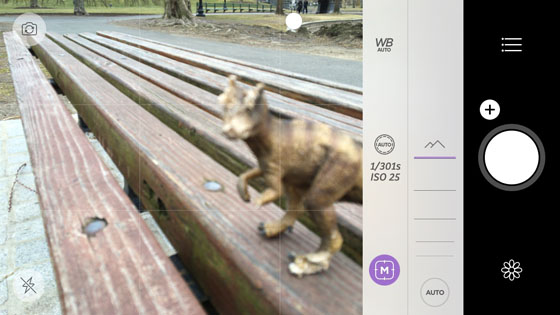
Simply drag the slider to manually control the focus of the camera (the “Auto” box will change to an “M” to indicate that you’re in manual focus mode).
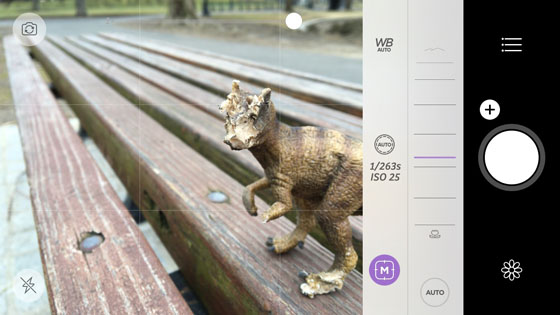
As you drag the focus slider, the focus point will gradually change, allowing you to focus on close-up objects, distant objects, or anywhere in between. This is a great way to fine-tune the focus when your subject is very close to the camera.
In summary, the standard tap-to-focus method offered by nearly all iPhone camera apps will suit your needs 90% of the time, and this is no different than using the autofocus setting of a DSLR. However, as with all cameras, there are times when having manual focus control can make all the difference in getting the shot just right. And in such cases, an app like Camera+ will give you full manual control of your focusing.
2. Exposure
After you set focus, it’s important that you get the exposure right to ensure your image doesn’t appear under or over-exposed.
Both the native camera app and Camera+ allow you to easily adjust the image exposure before you take the shot. The method used for setting exposure is different in these two apps, so we’ll explore both apps in this section. In the native camera app, when you tap on the screen to set your focus point, you’re also setting the point from which the camera analyzes the scene and sets the basic exposure level.
The yellow square in the screenshot below shows where the camera is setting its focus point, and also where it’s taking its exposure reading from. So whatever appears inside the yellow square should be correctly exposed. This works fine in many cases, as the point of focus is also likely to be the area of your image that you want exposed correctly – such as the face of your subject in a portrait photo.
However, there are plenty of times when this approach doesn’t work. In landscape photography you’ll often want to focus on a darker object in the foreground but expose for the brighter sky.
If you want to create a silhouette, you’ll need to reduce exposure to darken the subject. Or maybe you’ll just want to tweak the exposure slightly to brighten or darken the entire scene.
In such situations you can easily adjust the exposure in the native camera app. After you’ve tapped to set your focus point, you’ll see a small yellow sun icon next to the focus square. This indicates that you can now adjust exposure.
Simply swipe up on the screen to increase exposure and make the image brighter, or swipe down to decrease exposure and make the image darker.
If you’re shooting with the Camera+ app, when you tap to set focus, you’re also setting the exposure point. However, this app gives you even more options for taking control of the exposure setting.
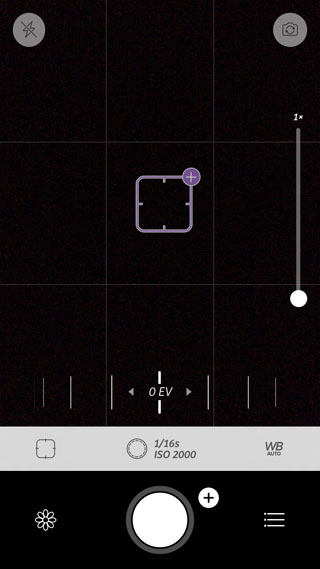
First, you can tap on the little plus sign “+” in the upper-right corner of the purple focus square. This brings up a separate orange circle which allows you to control the exposure point.
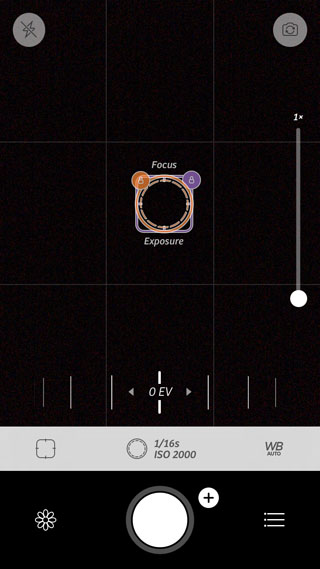
Simply drag the orange exposure circle to another area of your image to set a separate exposure point from the focus point. Note that you can also tap the screen with two fingers to bring up the separate focus and exposure tools.
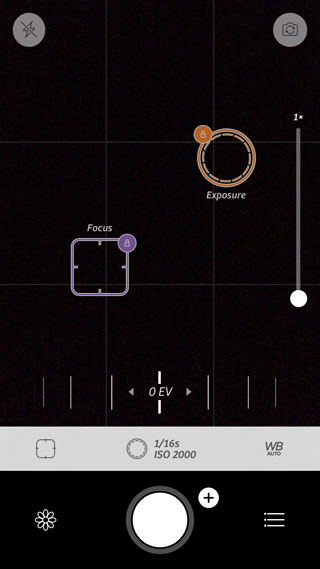
When you activate the second exposure tool, you’ll also notice the appearance of a slider along the bottom of the screen.
This is an exposure compensation tool that allows you to further refine the overall exposure setting, much like the sliding sun icon found with the native camera app.
The difference is that you can use this slider on its own or in conjunction with the separate “tap-to-set” exposure point to fine-tune the setting.
3. Shutter Speed
If you’re a DSLR photographer, you may have used the shutter speed settings on your camera to help you control exposure and determine how any movement appears in the scene – from freeze-framing to creating beautiful motion blur.
While you might not immediately associate the iPhone with the ability to control shutter speed, it’s perfectly possible to create amazing results in both fast and slow shutter photography.
Before we go any further, it should quickly be explained that exposure in all forms of photography is determined by three factors: ISO, shutter speed and aperture. Each of these settings will affect your image in a different way, so the key is to determine what’s most important to you for your image and then balance all three of the settings accordingly.
The following chart provides you with the classic exposure triangle, showing you how shutter speed, aperture and ISO will affect your image.
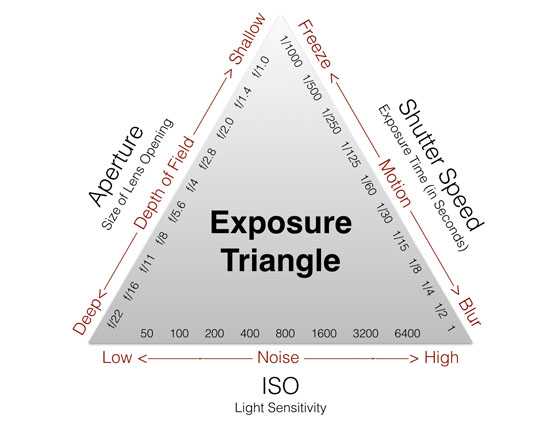
Now let’s start by learning more about shutter speed. The camera’s shutter speed determines the length of time that your camera’s sensor is exposed to light. The shorter the shutter speed, the less light reaches the sensor, and vice versa. Where creative use of shutter speed comes in handy is controlling how motion appears in your photos.
Using a fast shutter speed helps you create crisp images of moving subjects because it freezes any motion in the scene. This photo is a great example of using a fast shutter speed to capture the person in mid-jump. Fast shutter speeds also help you avoid blurry photos that result from camera shake. So if you’re hand-holding the camera, especially in low light, a faster shutter speed might eliminate the camera shake.
The iPhone shutter speed can’t be adjusted in the native camera app, but you can easily adjust it using an app like Camera+.
Just tap the middle icon above the shutter release button (or to the left if you’re holding your phone horizontally) to access the manual shutter speed and ISO control sliders.Shutter speed is measured in seconds, and most speeds are expressed as a fraction of a second (e.g. 1/60, 1/500).If you’re not familiar with shutter speed measurements, the exposure triangle diagram above will help you quickly understand which numbers are faster and which are slower. Using a slower shutter speed allows you to do long exposure photography at night and blur moving subjects such as flowing water. To avoid camera shake you should use a tripod.
The 7 Best iPhone Photography Apps
There are thousands of excellent photo apps on the App Store, and the things you can do with apps are absolutely incredible. With that said, the number of photo apps out there is overwhelming, and it’s really hard to know which apps are worth getting.
4. ISO
ISO affects how sensitive your camera’s sensor is to light. The higher the ISO setting, the more sensitive your camera is to light.
The main benefit of this is that you can use faster shutter speeds in low light conditions which helps to avoid camera shake when hand-holding the camera.However, one thing to keep in mind is that higher ISO settings can result in images with more digital “noise.” Noise makes your photos appear grainy which can reduce the overall image quality.
Conversely, the lower the ISO setting, the lower the light sensitivity will be. This means that the camera needs to use a slower shutter speed to let enough light in to expose the image correctly, but you’ll also experience less noise resulting in a “cleaner” imageIn Camera+, the iPhone ISO setting can be accessed via the same button as the shutter speed control just above or to the side of the shutter release button. This side-by-side placement of shutter speed and ISO is very convenient as the two need to be balanced in order to capture a well-exposed image.
For example, if you want to use a very fast shutter speed, you’ll likely need to use a higher ISO setting to capture more light and balance the faster shutter setting.
5. Depth Of Field
The third element in the exposure triangle is the aperture of the lens, which equates to the size of the lens opening. As you can likely imagine, the bigger the opening, the more light reaches the camera’s sensor.The other thing that aperture affects is depth of field. This is the range of focus/sharpness in front of and behind your subject.
The smaller the aperture, the deeper your depth of field, which results in more of your photo being in focus. A large aperture creates a very shallow depth of field, where only a small portion of the image is in focus. Shallow depth of field is often used to great effect by portrait photographers to isolate the main subject and blur the background, but it’s great for isolating any kind of subject, especially against a busy background. The one drawback to the iPhone camera is that the aperture of the lens is fixed. This means that unlike a DSLR camera, you can’t manually change the aperture setting to control the depth of field.
However, there are certainly other ways that you can manipulate the depth of field in your iPhone photos. If you’re familiar with aperture settings from using a DSLR, you may be interested to know that the iPhone camera aperture on the latest iPhone 7 models is f/1.8. While this is a fairly wide aperture, you also have to be aware that when combined with a very small, wide angle lens like that on the iPhone, it still provides relatively deep depth of field in most photos.
This deep depth of field is great for casual photography, and it’s especially good for landscape and architectural photography where you want every element to be in sharp focus.
While aperture is important for controlling depth of field, the other factor that affects it is the distance between the camera’s lens and the subject.
The closer the lens is to the subject, the shallower the depth of field will be. So to create a shallow depth of field with the iPhone, just get nice and close to your subject, and make sure you set the focus point on the subject.
You can either tap to set focus, or use the manual focus slider in Camera+ to fine tune the focus to get it exactly where you want. This shallow depth of field will be even more pronounced if you use an add-on macro lens designed specifically for shooting extreme close-ups.
Popular macro lenses include those from Moment and olloclip, and they allow you to shoot at very close distances to the subject.If you have the iPhone 7 Plus, you’ll also be able to take advantage of the Portrait shooting mode in the native camera app to create a shallow depth of field.
6. Zoom
The close-up zoomed image is clearly grainy and lower quality than the full frame image.
For this reason, most photographers (including myself) will recommend that you never use the zoom control on your iPhone camera.
It’s better to take the full frame image and then crop it later in editing. That way, you always have the full image to revert back to if you don’t like the lower resolution image that results from the cropping. On the iPhone 7 Plus, ensure the shooting mode in the camera app is set to Photo, then tap the 1x option on the screen to switch to 2x mode. You’ll now be taking photos with the telephoto lens.
If you don’t have the iPhone 7 Plus, you might want to consider purchasing one of the many add-on telephoto lenses for iPhone. On the iPhone 7 Plus, ensure the shooting mode in the camera app is set to Photo, then tap the 1x option on the screen to switch to 2x mode. You’ll now be taking photos with the telephoto lens.
Two of the best lenses that I’ve used are the Moment Telephoto and the Ztylus Telephoto. Both options are considered 2x telephoto lenses because they both bring you twice as close to your subject as the native camera lens. The Moment Telephoto is available on its own for $89, while the Ztylus Telephoto is available as part of a kit along with a wide angle lens and other accessories for $149.
Conclusion
The manual controls of your iPhone camera are far easier to use than those on a DSLR, yet they give you almost the same level of control and creativity. And the best thing about the iPhone camera is that it’s always with you, so you’ll never miss out on great photos when you’re not carrying your bulky DSLR. Once you master the manual camera settings on your iPhone, you’ll soon discover that your iPhone camera is the only camera you need.